 GymTraining
How to Improve Posture at Home: A 15–20 Minute Exercise Routine
Slouching usually has less to do with willpower than with your habitual position and a lack of movement. Here is a 7-exercise routine you can do at home in 15–20 minutes, no gym equipment needed.
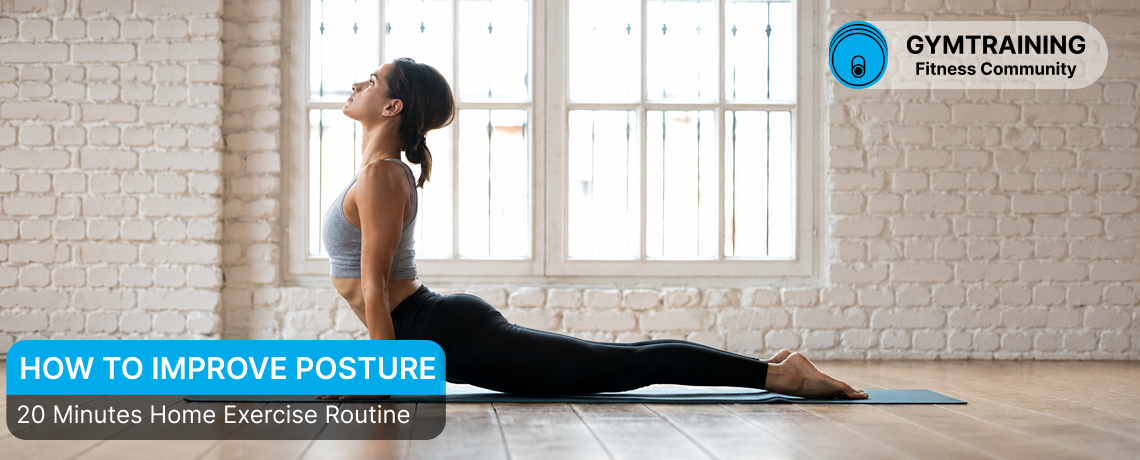
You do not need to hold your back rigid or force your shoulders backward all day to feel more upright after long periods of sitting. A more practical approach is to improve upper-back mobility, strengthen the muscles around the shoulders, and develop better control of the torso.
You do not need a gym for this routine. All you need is a wall, some open floor space, and a regular backpack that you can gradually load with books or water bottles.
The shorter version of the routine takes about 15–20 minutes. It includes the preparation exercises and two sets of the main strength movements. The full version, with additional sets, may take about 25 minutes.
Perform the routine three times per week for four weeks, preferably leaving at least one rest day between sessions. For example, you could train on Monday, Wednesday, and Friday.
After four weeks, assess the results. Notice whether it feels easier to raise your arms, maintain a comfortable head position while working, control your torso, and use a heavier backpack during rows.
Exercise programs that combine strengthening, mobility work, and movement control may improve forward head posture, rounded shoulders, and the position of the upper back. However, results depend on consistency, individual anatomy, and the design of the program. There is no single “magic” exercise that fixes posture for everyone.
This routine is intended for adults without acute pain or a recent injury who spend a lot of time sitting and want to improve mobility, strength, and movement control. It is not a treatment for scoliosis, structural hyperkyphosis, or other spinal conditions.
What Good Posture Really Means
Good posture does not mean arranging your entire body along a perfectly straight line and freezing in that position. Even a posture that looks upright can become uncomfortable when held for several hours.
A more practical goal is to find positions in which you can move freely and breathe comfortably without constant muscular tension. Your head should not have to reach toward the screen all day, your shoulders should be able to remain relaxed, and your torso should feel stable without becoming rigid.
It is also important to change positions regularly. There is no single perfect posture that you need to maintain from morning until night.
Three common features tend to attract the most attention:
- Forward head posture. The chin drifts toward the screen, and the head sits noticeably in front of the rib cage.
- Rounded shoulders. The shoulders turn forward, especially after long periods of working on a laptop.
- Increased rounding of the upper back. The thoracic spine appears more flexed, and raising the arms without arching the lower back may become more difficult.
These features can occur together, but they do not always indicate an injury or medical condition. Posture is influenced by skeletal structure, joint mobility, habits, fatigue, the work environment, and the ability of the muscles to tolerate load.
The appearance of your posture alone also cannot explain the cause of pain or determine the health of your spine.
The goal of a home posture routine is not to “put the spine back into place.” The goal is to improve strength, mobility, and movement control so that a more upright position can feel comfortable without requiring constant effort.
What Should You Train to Improve Posture?
A practical posture routine should address four main areas.
Thoracic and Shoulder Mobility
The thoracic spine should be able to extend comfortably. When the upper back remains flexed for long periods, the neck, shoulders, and lower back may take over part of the movement.
That is why the routine begins with controlled mobility exercises at the wall. Before the strength portion, you can also use a short warm-up before strength training.
Upper-Back and Shoulder Strength
It is useful to strengthen the upper-back muscles, the muscles at the back of the shoulders, and the muscles involved in controlling the shoulder blades.
That is why the routine includes prone Y–T–W raises and a backpack row rather than mobility work alone. For a more detailed look at rowing technique and exercise variations, see the complete guide to rows.
Core Endurance and Control
The core helps stabilize the torso while the arms and legs move. Its job is not to pull the stomach in all day, but to create enough tension when it is needed.
The routine uses the bird dog to train this type of control.
Glute Strength
The glutes contribute to hip extension and help control the position of the pelvis. This matters during walking, climbing stairs, standing up, and lifting or carrying objects.
The glute bridge does not directly change shoulder position, but it adds a simple lower-body strength exercise and helps train pelvic control.
A practical approach combines mobility, strength training, and movement control. Studies vary in duration, exercise selection, and the way posture is measured, so no routine can guarantee the same result for everyone.
Posture Exercises You Can Do at Home
Perform each exercise slowly and without jerking. During the first two weeks, finish each set with about three repetitions in reserve. Stop when you feel that you could still complete approximately three more controlled repetitions.
Moderate muscular effort and a mild stretching sensation are usually acceptable. Stop the exercise if you experience sharp or shooting pain, numbness, significant dizziness, unexpected weakness, or a clear worsening of symptoms.
If pain began after an injury, is rapidly getting worse, or is accompanied by changes in sensation, postpone the workout and seek advice from a qualified healthcare professional.
1. Thoracic Extension at the Wall
This exercise helps improve mobility in the upper back and shoulders without replacing the motion with an excessive arch in the lower back.
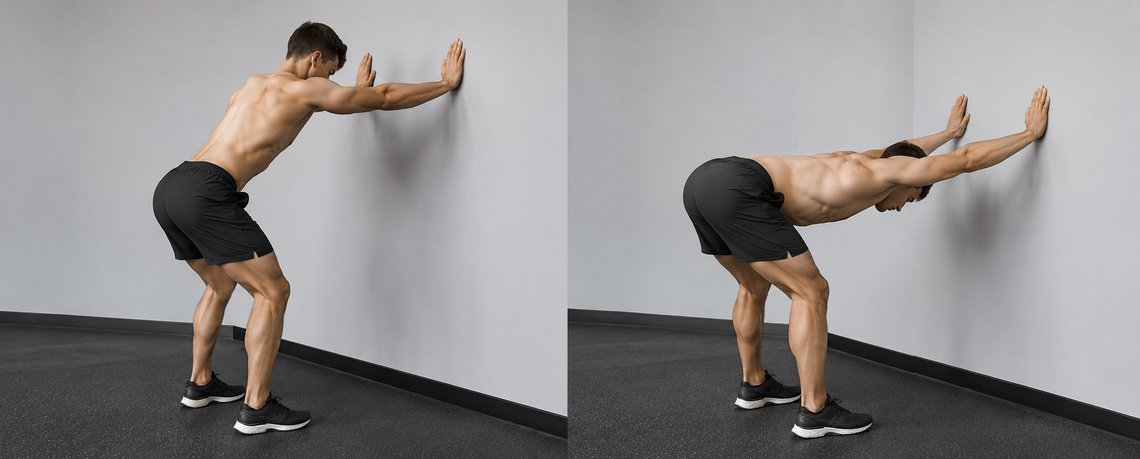
Stand facing a wall about one large step away. Place your palms on the wall slightly above shoulder height.
Move your hips backward, bend your knees slightly, and lower your chest between your arms toward the floor.
Do not force the movement. You should feel it mainly through the upper back and shoulders rather than as pressure or a strong arch in the lower back.
Pause in the bottom position for one or two seconds, then return slowly to the starting position.
Perform 8–10 repetitions. If the position feels uncomfortable in your shoulders, place your hands lower or reduce the range of motion.
2. Chin Tuck
The chin tuck trains control of the head relative to the rib cage. It is not a forceful backward movement of the neck, but a small and controlled motion.
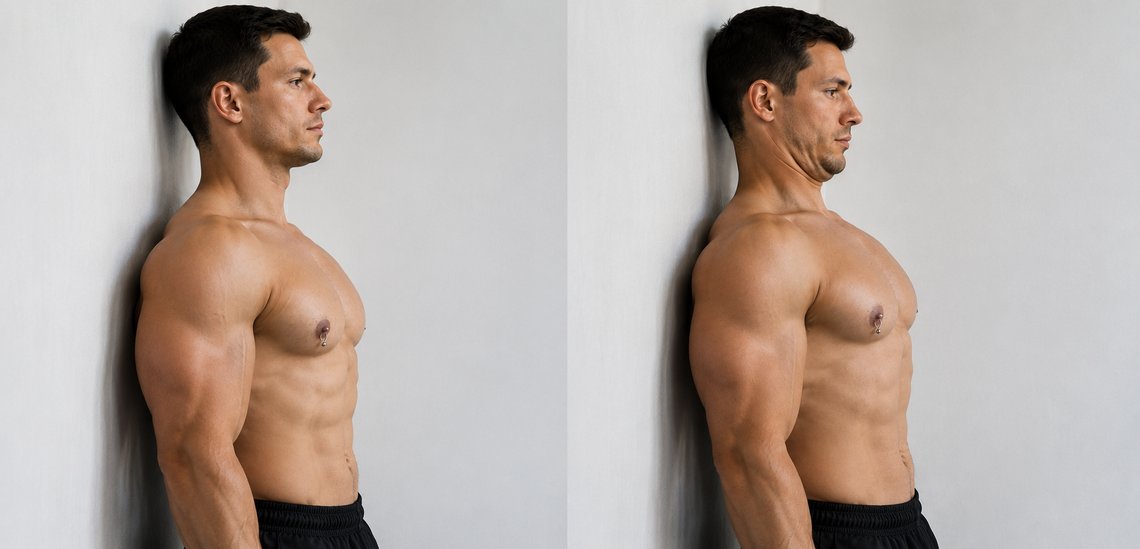
Stand with your back against a wall or sit in a comfortable upright position. Look straight ahead.
Without lowering your head or tilting it backward, gently draw your chin back as if you were making a slight double chin.
Hold for two seconds, then relax.
Perform 10–12 repetitions.
Do not force the back of your head against the wall. Head shape, rib-cage structure, and spinal curves vary from person to person.
The goal is to improve control of head position, not to achieve perfect body geometry.
3. Wall Slides
Wall slides combine shoulder mobility with control of the torso and shoulder blades.
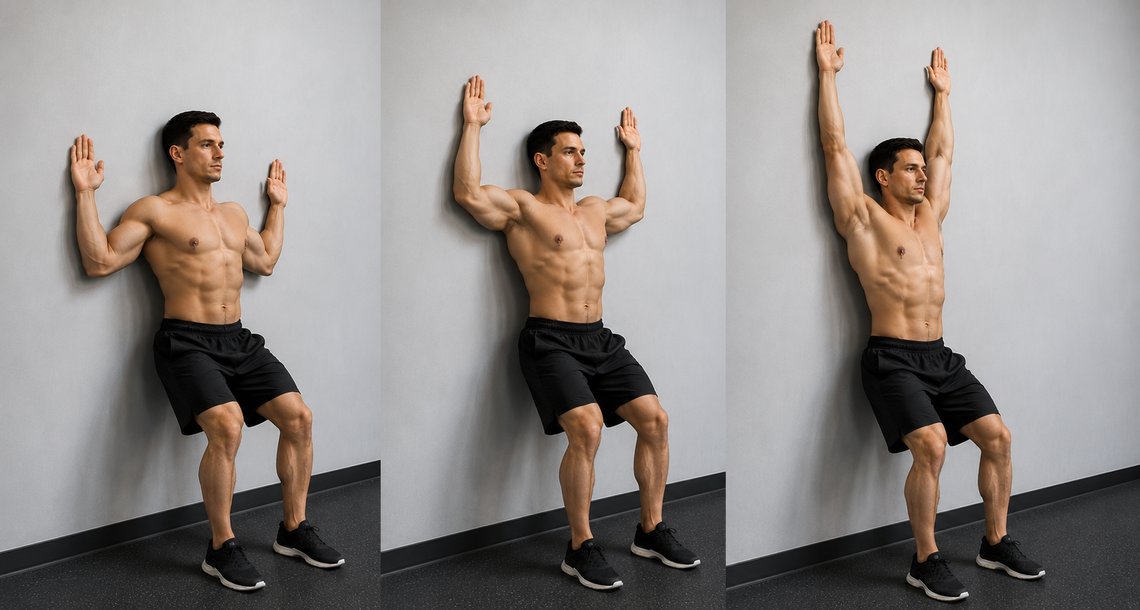
Stand with your back against a wall and place your feet a short distance away from the wall. Bend your knees a little, raise your arms out to the sides, and bend your elbows.
Slowly slide your arms upward. Avoid flaring the lower ribs or increasing the arch in your lower back.
Raise your arms only as high as you can while staying controlled and keeping your shoulders away from your ears.
Lower your arms just as slowly.
Perform 2 sets of 8–12 repetitions.
You do not need to force your hands, elbows, or head against the wall. This is a movement and control exercise, not a test of perfect anatomy.
4. Prone Y–T–W Raises
This exercise combines three arm positions and trains the upper back and rear shoulder muscles.
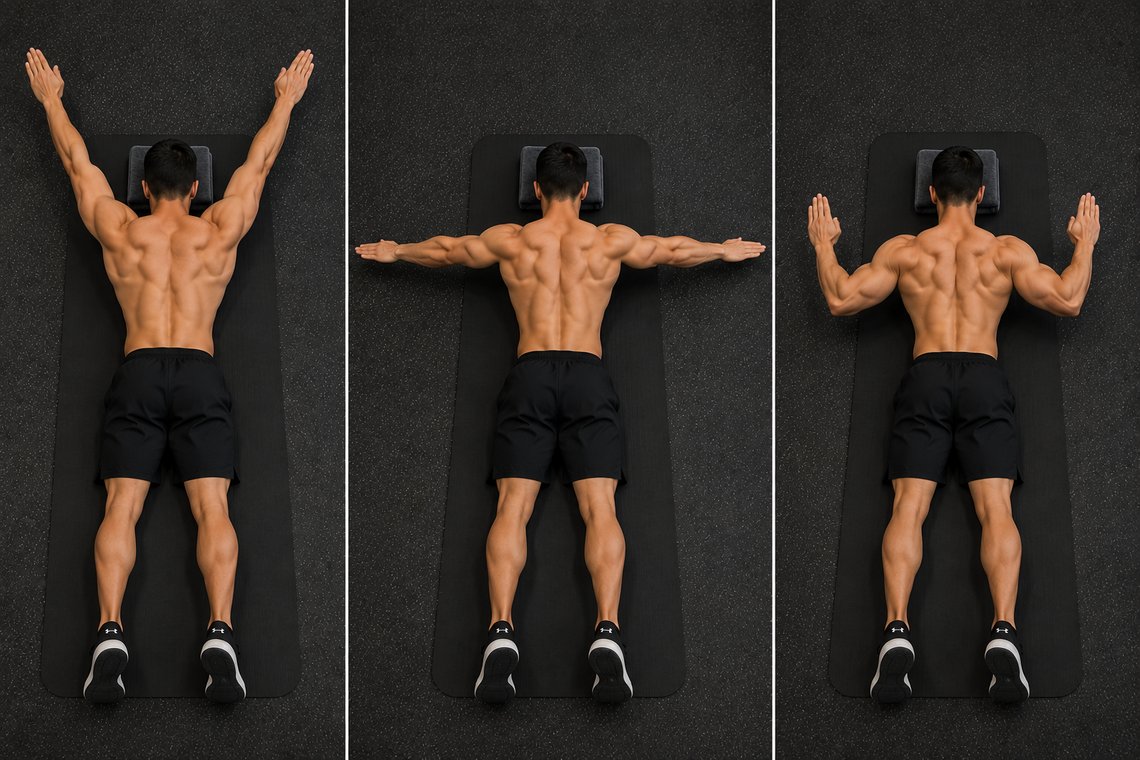
Lie face down. Place a folded towel under your forehead so that your neck remains in a comfortable position.
First, extend your arms diagonally overhead to form the letter Y. Lift them slightly off the floor, pause for one second, and lower them.
Next, extend your arms out to the sides to form the letter T.
Then bend your elbows and draw them downward to form the letter W.
Move slowly in each position. Do not try to lift your arms higher by strongly arching the lower back. Keep your shoulders away from your ears.
Perform 6–8 repetitions in each position.
One full round of Y–T–W is enough during your first few workouts. If the movements feel controlled and manageable, you can progress to two rounds.
If one position is difficult without compensating, reduce the range of motion and lift your arms only a few inches from the floor.
5. Bent-Over Backpack Row
Mobility exercises can help you move more freely, but resistance is needed to build strength. At home, a loaded backpack is a convenient option.
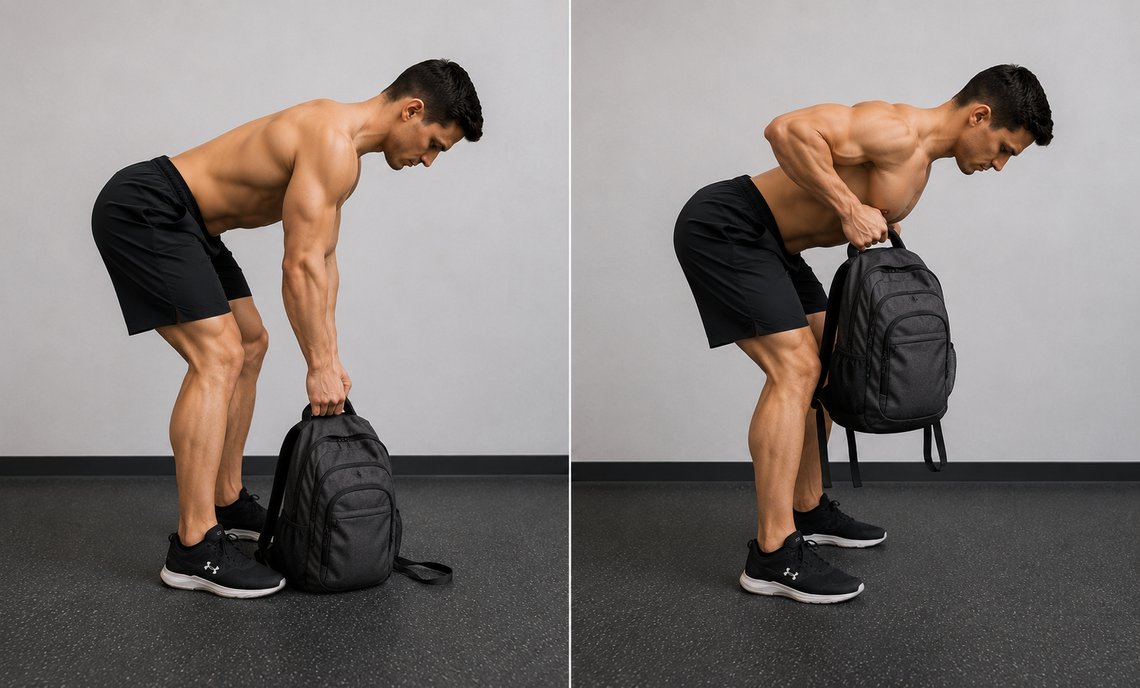
Place several books or water bottles inside the backpack and hold the top handle with both hands.
Move your hips backward, bend your knees slightly, and lean your torso forward. Choose a back position that you can maintain comfortably and under control.
Pull the backpack toward the lower chest or upper abdomen. Drive your elbows backward, but do not squeeze your shoulder blades together as hard as possible.
Pause for one second at the top, then lower the backpack under control.
During the first week, perform 2 sets of 8–15 repetitions. From the second week, you can increase the volume to 3 sets.
The load is appropriate when the final repetitions feel clearly more difficult, but your torso does not swing and your shoulders do not rise toward your ears.
If you can perform 15 controlled repetitions in every set and still feel that several more would be possible, add a small amount of weight and return to 8–10 repetitions. For more guidance, see when you should increase the amount of weight you lift.
If you find it difficult to maintain the bent-over position, reduce the weight. Another option is to support yourself with one hand on a stable table or chair and row the backpack with the other hand. Then switch sides.
6. Bird Dog
The bird dog trains torso control while one arm and the opposite leg move.
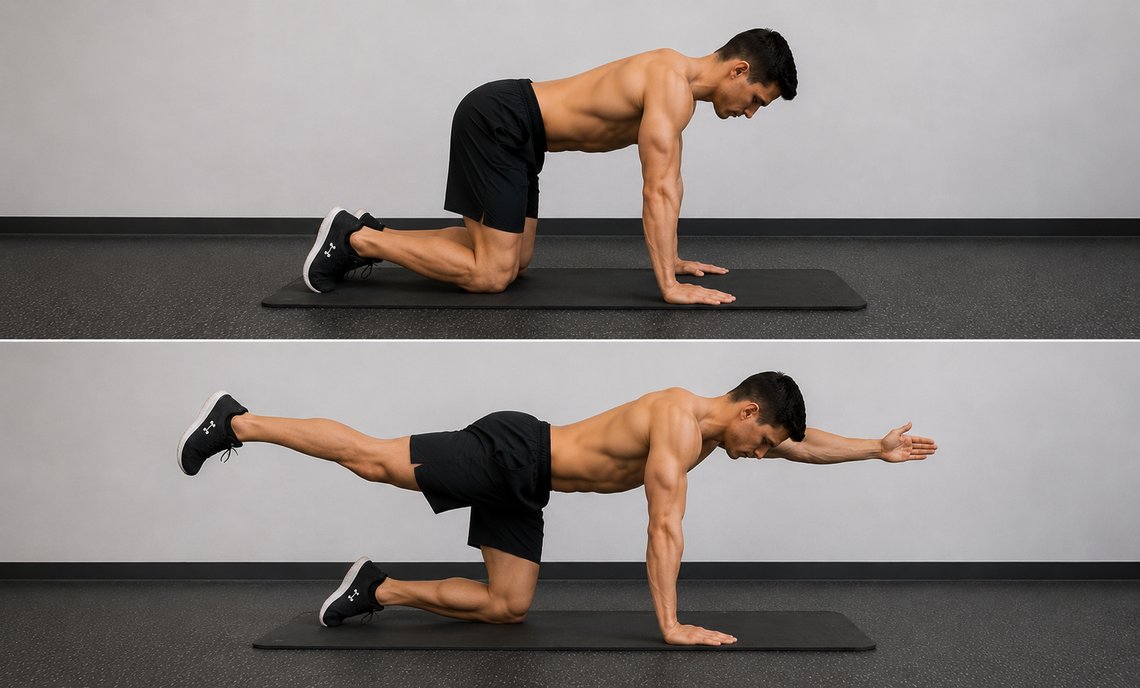
Begin on all fours with your hands under your shoulders and your knees under your hips.
Gently brace your midsection. Reach your right arm forward while extending your left leg backward.
Do not try to lift the leg as high as possible. The goal is to prevent the pelvis from rotating excessively and the lower back from collapsing downward.
Hold for two seconds, return to the starting position, and switch sides.
Perform 2 sets of 6–10 repetitions per side.
If balance is difficult, begin by moving only one arm or one leg at a time.
If the position feels uncomfortable for your wrists, support yourself on your fists or place your hands on a stable elevated surface.
7. Glute Bridge
The glute bridge strengthens the muscles involved in hip extension and helps train control of the pelvis.
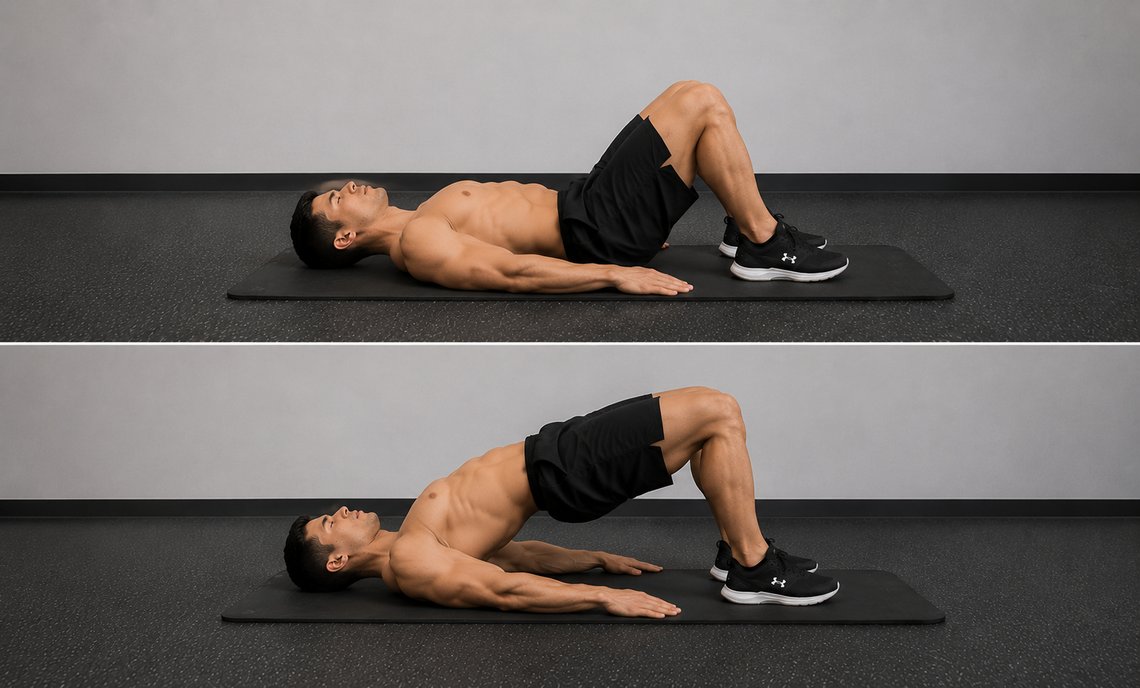
Lie on your back, bend your knees, and place your feet about hip-width apart.
Tighten your glutes and lift your hips. At the top, your torso and thighs should form roughly one line.
Do not try to lift higher by excessively arching the lower back.
Pause for one second, then lower your hips slowly.
During the first week, perform 2 sets of 10–15 repetitions. From the second week, you can increase the volume to 3 sets.
When the basic version becomes too easy, increase the pause at the top to three seconds or place a light backpack across your hips. Hold it in place with your hands so that it does not slide.
Short 15–20 Minute Posture Workout
Begin with thoracic extension at the wall, chin tucks, and wall slides. You need little or no rest between these exercises.
Then move on to the Y–T–W raises, backpack rows, bird dogs, and glute bridges. Rest for approximately 30–60 seconds between strength sets. If you need more time to maintain good technique, rest longer.
| Exercise | Short version | Full version |
|---|---|---|
| Thoracic extension at the wall | 8–10 repetitions | 8–10 repetitions |
| Chin tuck | 10–12 repetitions | 10–12 repetitions |
| Wall slides | 2 × 8–12 | 2 × 8–12 |
| Prone Y–T–W raises | 1 × 6–8 in each position | 2 × 6–8 in each position |
| Backpack row | 2 × 8–15 | 3 × 8–15 |
| Bird dog | 2 × 6–10 per side | 2 × 6–10 per side |
| Glute bridge | 2 × 10–15 | 3 × 10–15 |
The shorter version usually fits within 15–20 minutes. The full version, with additional sets, may take about 25 minutes.
It is better to complete the shorter workout consistently than to perform one exhausting session and abandon the program.
4-Week Progression Plan
Week 1: Learn the Technique
Complete three workouts, leaving at least one rest day between sessions.
Use the shorter version of the routine. Perform two sets of wall slides, backpack rows, bird dogs, and glute bridges. One round of Y–T–W is enough.
Choose a backpack weight that allows you to finish each set with about three repetitions in reserve. Do not try to create maximum fatigue during the first week.
Week 2: Increase Training Volume
Continue training three times per week.
If you are recovering well and your technique remains controlled, increase the backpack row and glute bridge to three sets.
Add repetitions to the other exercises only when the movements remain controlled.
If one round of Y–T–W no longer feels challenging, you can perform two rounds.
Week 3: Increase the Difficulty
If you can complete 15 controlled backpack rows in every set and still perform several more repetitions, add a small amount of weight.
For the glute bridge, increase the pause at the top to three seconds or place a light backpack across your hips.
During Y–T–W raises, lower your arms more slowly, taking about three seconds. Do not add weight until you can keep your shoulders away from your ears.
During the bird dog, you can increase the hold in the end position to three seconds.
Week 4: Reinforce the Movement Patterns
Keep the same training volume you used in week three. You do not need to increase the weight or repetition count in every exercise.
Focus on making every repetition smooth, controlled, and consistent.
The goal of the fourth week is to make the movements feel familiar and manageable without having to think about every detail of the technique.
After four weeks, you can continue using the same routine while gradually increasing resistance. Another option is to replace individual exercises with resistance-band, dumbbell, or gym-based variations.
You can also progress without immediately adding more weight. See three ways to progress without lifting heavier.
How to Tell Whether the Routine Is Working
Do not judge progress from a single random photograph. Posture can change with fatigue, mood, time of day, and the situation.
If you want to compare photographs, take a side-view picture before starting the program and another after four weeks. Use the same clothing, camera distance, and similar lighting. Stand naturally instead of deliberately trying to “correct” your posture.
Also pay attention to practical changes:
- Is it easier to raise your arms overhead?
- Do your neck and shoulders feel less tired while working?
- Can you perform the bird dog with less torso movement?
- Has the weight of your backpack row increased?
- Do you feel less stiff after long periods of sitting?
A combination of improved mobility, greater strength, better control, and more comfortable movement provides a more useful picture than appearance alone.
How to Improve Posture While Sitting at a Desk
Three workouts per week can be helpful, but they do not turn ten hours of almost uninterrupted sitting into an active lifestyle.
You do not need to perform a full mobility routine every hour. Start by standing up regularly, walking for a few minutes, and changing positions throughout the day.
Try a simple rule: when you finish a work task, stand up, walk around the room, move your shoulders a few times, and then begin the next task.
Position your screen so that you do not constantly reach your head forward. If the text is too small, increase the font size or move the screen closer.
Even a well-designed workstation cannot replace regular movement. For additional mobility ideas aimed at people who spend most of the day seated, see yoga for desk workers.
Common Posture Exercise Mistakes
Forcing “Perfect” Posture All Day
If you constantly squeeze your shoulder blades together, push the chest forward, and arch the lower back, the muscles will quickly become tired.
A comfortable position should not depend on continuous maximum tension. Allow your body to move and change positions.
Relying Only on Mobility Work
Mobility exercises may temporarily reduce stiffness and make movement feel easier. However, without resistance training, the upper-back muscles will not become stronger or better prepared for load.
That is why the routine combines mobility and strength exercises.
Using a Backpack That Is Too Light
If the backpack weighs very little and you can perform forty repetitions without fatigue, it will eventually stop providing enough resistance to develop strength.
Increase the weight only after you can reach the upper end of the repetition range in every set with good control.
Using a Backpack That Is Too Heavy
Too much weight may cause you to jerk the torso, shrug the shoulders, or lose control of your back position.
Reduce the load if you cannot complete the planned repetitions smoothly and without swinging.
Forcing a Larger Range of Motion
During wall slides and Y–T–W raises, lift your arms only as high as you can without sharp pain or obvious compensatory movement.
A smaller controlled range is more useful than a larger movement achieved only by arching the lower back or shrugging the shoulders.
Frequently Asked Questions
Can You Improve Posture in One Week?
In one week, you may become more comfortable with the exercises and feel slightly less stiff. More noticeable changes in strength, control, and habitual body position usually require several weeks of consistent training.
How Long Does It Take to Improve Posture?
The timeline varies from person to person. Four weeks is enough to assess whether movement feels easier and strength is improving, but larger changes may require several months of regular training.
Should You Do Posture Exercises Every Day?
The full routine can be performed three times per week. The lighter mobility exercises may be performed more often if they feel comfortable and do not increase symptoms.
Daily training is not essential. Consistency over several weeks and gradual progression are more important.
Can Planks Fix Slouching?
Planks train the core, but they do not replace upper-back and shoulder training.
You can add them to the routine, but a plank alone is not a complete solution for posture. For technique guidance, see the plank exercise guide.
Can Pull-Ups Improve Posture?
Pull-ups strengthen the lats, arms, and several muscles around the shoulder girdle, but they do not address every goal of this routine.
They do little to train head-position control, they do not replace thoracic mobility work, and they may be too difficult for beginners.
Pull-ups can be part of a general strength program, but a home posture routine should include several different movement patterns.
Should You Keep Your Shoulder Blades Squeezed Together?
No. The shoulder blades should move freely with the arms. They glide, rotate, and change position as the arms move.
Holding them tightly together all day may create unnecessary fatigue. During rows, drive the elbows backward without trying to pinch the shoulder blades as hard as possible.
Does Stretching the Chest Improve Posture?
Chest stretching may temporarily reduce tension and make some shoulder movements feel easier.
However, a long-term program should not consist of stretching alone. A more practical approach combines mobility, strength training, and movement control.
Can You Exercise With a Rounded Back?
The spine does not need to remain perfectly straight during every movement. Flexion, extension, and rotation are normal movement options.
During a heavy backpack row, beginners usually find it easier to choose a stable and controlled torso position rather than allowing the back to round uncontrollably under load.
The main priorities are appropriate resistance, controlled movement, and the absence of sharp pain.
Can You Do This Routine With Scoliosis or Kyphosis?
The word “slouching” may refer to a habitual body position or to structural changes in the spine.
A general home routine cannot account for every form of scoliosis, hyperkyphosis, osteoporosis, or previous spinal injury.
If you have a diagnosed condition, new symptoms, or concerns about the exercises, discuss the routine with a qualified professional.
When Should You See a Professional?
Postpone the workout and seek professional advice if pain is severe or rapidly worsening, began after a fall or injury, or is accompanied by significant numbness, changes in sensation, or unexpected weakness.
A visibly progressing change in spinal shape should also not be managed with a general exercise routine alone.
Key Takeaways
You do not need to monitor your shoulder position every minute or keep your back tense all day to improve posture.
A more useful approach is to work on thoracic and shoulder mobility, strengthen the upper back, train torso control, and gradually increase resistance.
Perform the shorter routine three times per week, change positions more often during the workday, and do not judge progress from photographs alone.
After four weeks, the routine should feel less like a corrective ritual and more like a short, structured strength workout with gradual progression.
If the routine feels comfortable, you can continue using it after four weeks or include the exercises in a broader home training program.
Recovery, sleep, and adequate nutrition also support consistent training. For more practical guidance, see post-workout recovery.
References
- Sepehri S. et al. The effect of various therapeutic exercises on forward head posture, rounded shoulder, and hyperkyphosis among people with upper crossed syndrome: a systematic review and meta-analysis. BMC Musculoskeletal Disorders. 2024.
- Porto A.B. et al. The effect of exercise on postural alignment: a systematic review. Journal of Bodywork and Movement Therapies. 2024.
- Fernández L.F. et al. Effect of Therapeutic Exercise on the Management of Hyperkyphosis in Adolescence and Young Adulthood: A Systematic Review. 2025.
- Argyrou S. et al. The Effectiveness of an Exercise Program Based on Motor Learning Principles for the Correction of the Forward Head Posture: a randomized controlled trial. 2025.
- Baek C.-Y. et al. Effect of digital health corrective posture exercise program on head and shoulder posture in adolescents: a cluster randomized controlled trial. 2025.
- Karatrantou K. et al. A Comprehensive Workplace Exercise Intervention to Reduce Musculoskeletal Pain and Improve Functional Capacity in Office Workers: A Randomized Controlled Study. 2024.
- Piruta J. et al. Physiotherapy in Text Neck Syndrome: A Scoping Review of Current Evidence and Future Directions. 2025.
- Rouyard T. et al. Effects of workplace interventions on sedentary behaviour and physical activity: an umbrella review with meta-analyses and narrative synthesis. The Lancet Public Health. 2025.
- Demissie B. et al. Low back pain and sitting time, posture and behaviour in office workers: a scoping review. 2025.
- Ponzano M. et al. Exercise for improving age-related hyperkyphosis: a systematic review and meta-analysis. 2021.